
Centos7部署Apache服务
环境声明
服务器
- 系统: Centos7.4
- IP地址: 192.168.132.111
- 网卡模式: 桥接模式
- 软件版本: httpd-2.4.6-67 | openssl-1.0.2 | Bind9.9.4
环境部署
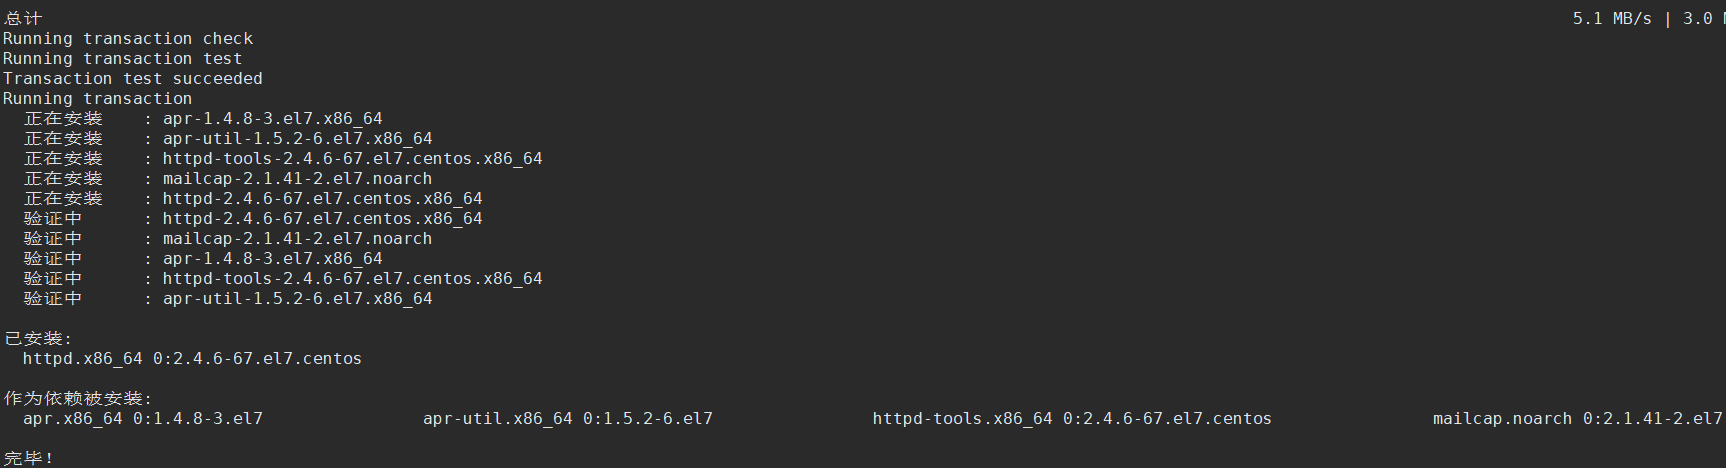
服务安装
1 | yum install httpd -y |
配置文件
| 文件路径 | 文件说明 |
|---|---|
| /etc/httpd/conf/httpd.conf | 主配置文件 |
| /etc/httpd/conf.d/ | 子配置文件目录 |
| /var/www/html/ | 默认Web根目录 |
| /var/log/httpd/ | 日志存放目录 |
常用配置项
基本配置
1 | # 指定监听端口 |
访问控制
1 | # 允许所以人访问 |
Options选项
1 | # 允许目录浏览 (该目录下无主页文件(index.html或其他)时则返回该目录的文件列表) |
AllowOverride选项
1 | # 忽略所有 .htaccess文件 |
部署示例
项目需求
- 网站根目录: /www/wwwroot/
- 主页文件名: hello.html
- 主页内容: Hello World
- 服务运行用户: webuser
- 允许所有人访问
先创建网站的目录,再将主页内容写入到主页文件中
1 | mkdir -p /www/wwwroot/ |
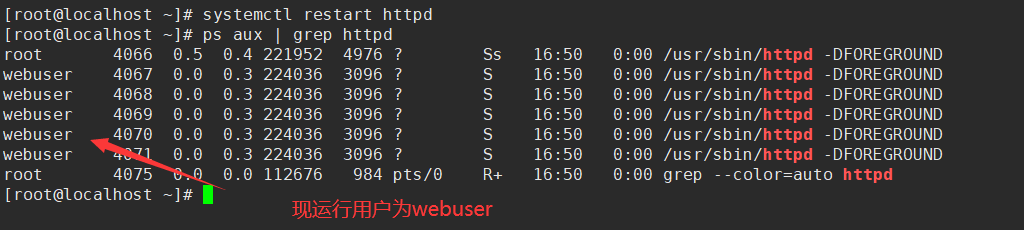
再添加一个用户,并将服务运行用户设置为新添加的用户
1 | useradd webuser -s /sbin/nologin |
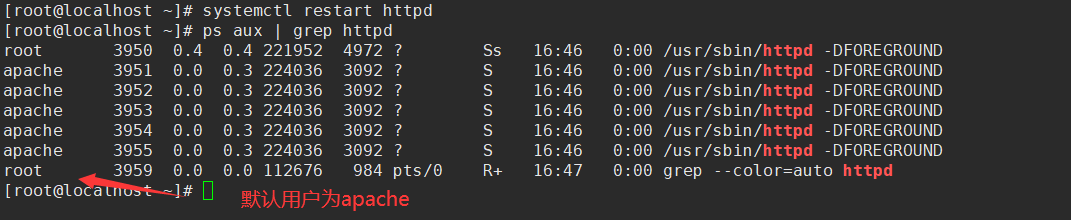
修改主配置文件,将User与Group值改为新添加的用户,保存退出后再将服务重启查看运行用户
1 | vim /etc/httpd/conf/httpd.conf |
再修改主配置文件,指定网站的根目录、主页文件等信息。
1 | DocumentRoot "/www/wwwroot/" |
修改完成后保存重启服务、关闭selinux、放行http后,进行访问测试
1 | systemctl restart httpd |

虚拟目录
虚拟目录配置
项目需求
- 网站根目录: /www/web1/
- 虚拟目录: /web1/
- 主页文件名: index.html
- 主页内容: Hello Web1
- 允许所有人访问
先创建网站的目录,再将主页内容写入到主页文件中
1 | mkdir /www/web1/ |
再配置主配置文件,因为默认的主页文件名为index.html,所以不用做配置,其他的配置同上即可。配置完成后重启服务再访问即可
1 | # Alias 虚拟目录 网站根目录 |

需要认证的虚拟目录
项目需求
- 网站根目录: /www/web2/
- 虚拟目录: /web2/
- 主页文件名: index.html
- 主页内容: Hello Web2
- 只允许用户w1、w2登录后访问(密码与用户名相同)
注: 该方法不止用于虚拟目录
先创建网站的目录,再将主页内容写入到主页文件中
1 | mkdir /www/web2/ |
在主配置文件中添加下方配置信息,AuthUserFile字段中的信息后续会用到
1 | Alias /web2/ /www/web2/ |
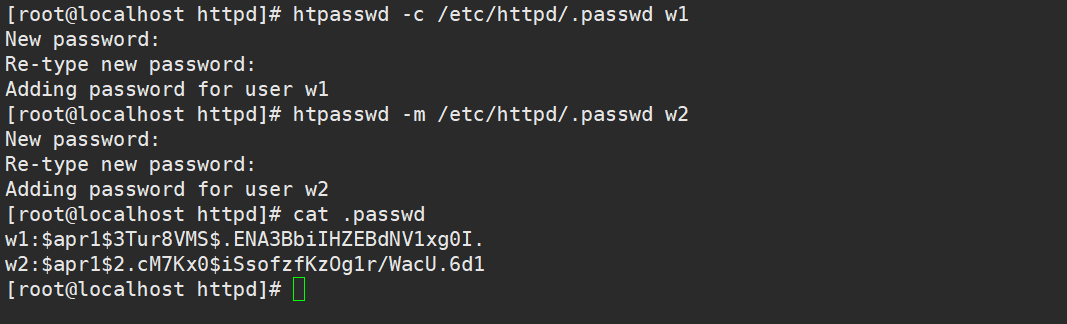
添加认证用户,命令格式为htpasswd -c 存储地址 用户名,执行完成后会在指定目录下创建一个文件用于存储用户账号密码
1 | htpasswd -c /etc/httpd/.passwd w1 # 第一次创建要使用 -c 参数创建 |
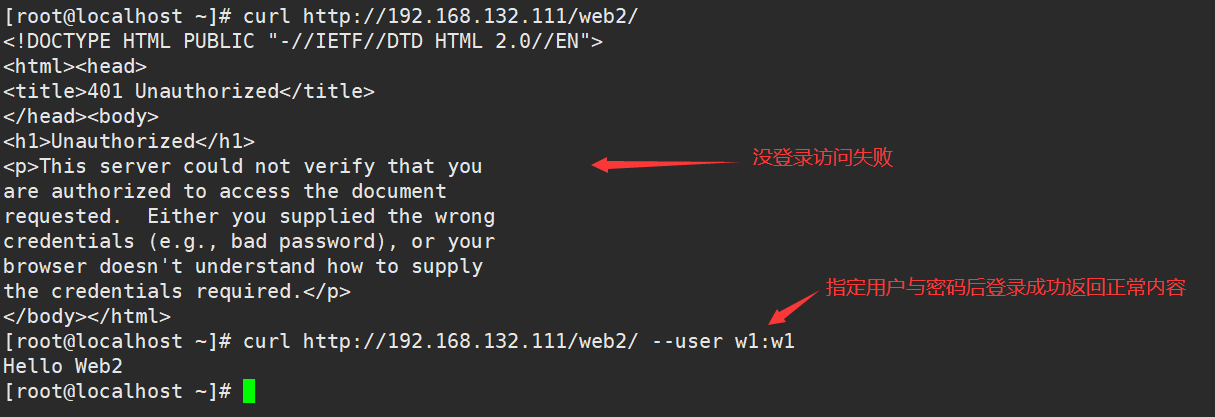
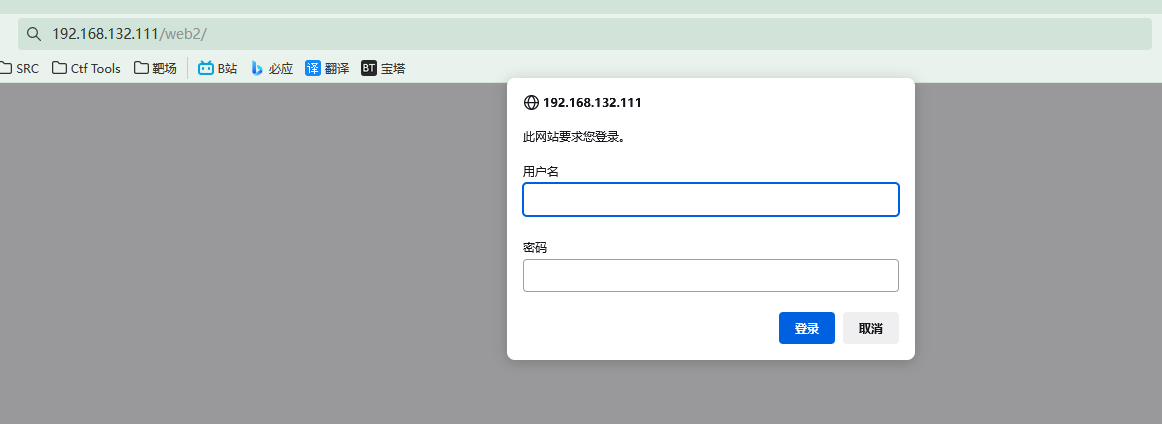
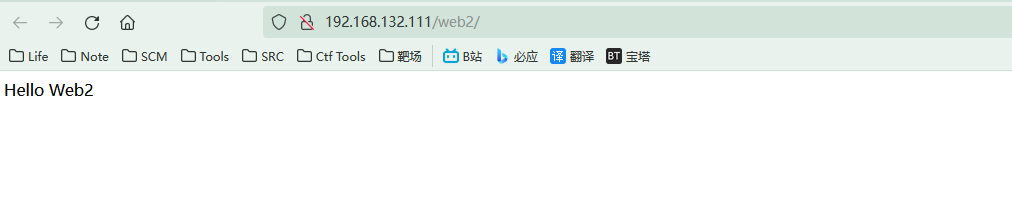
创建完成后重启httpd服务器,再使用浏览器访问该页面
1 | # 使用curl访问 |
虚拟主机
基于端口
项目需求
- 网站根目录: /www/8080/
- 网站端口: 8080
- 主页文件名: index.html
- 主页内容: Hello 8080
- 网站根目录: /www/8081/
- 网站端口: 8081
- 主页文件名: index.html
- 主页内容: Hello 8081
可以将下方配置写在主配置文件中,但为了方便维护与规范,需创建子配置文件/etc/httpd/conf.d/vhost.conf,并将下方内容复制到子配置文件中
1 | Listen 8080 # 监听的端口 |
配置完成后重启过httpd服务、放行8080|8081端口后访问测试

基于IP
项目需求
- 网站根目录: /www/111/
- 网站IP: 192.168.132.111
- 主页文件名: index.html
- 主页内容: Hello 111
- 网站根目录: /www/112/
- 网站IP: 192.168.132.112
- 主页文件名: index.html
- 主页内容: Hello 112
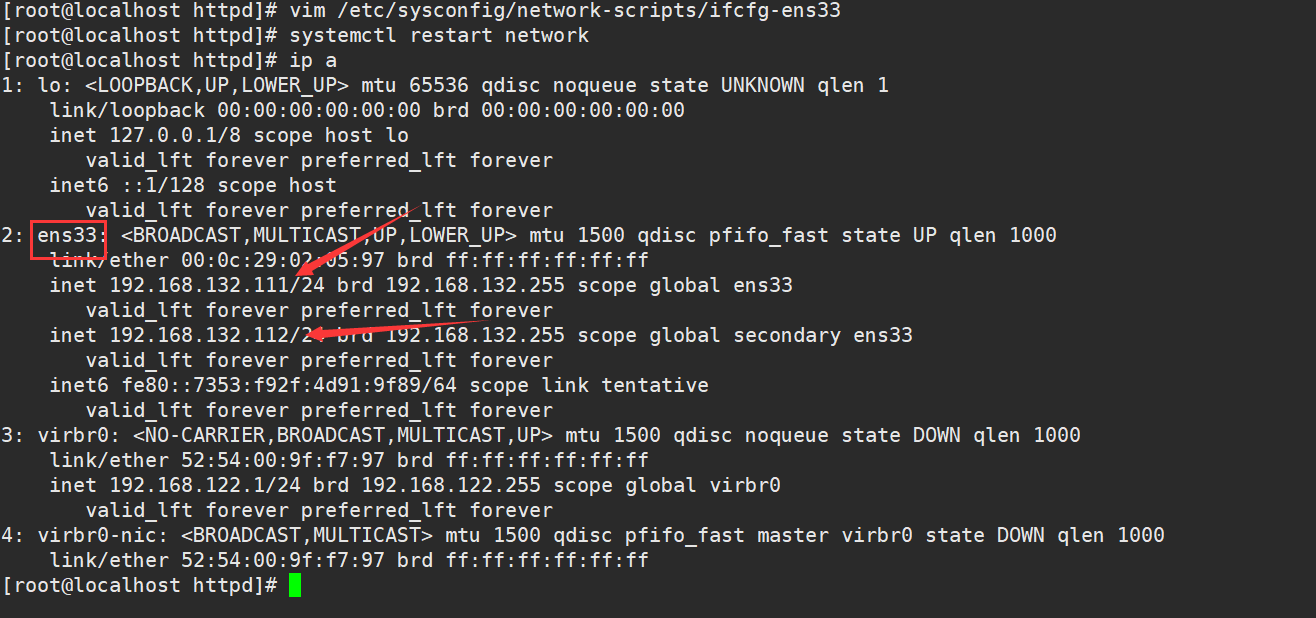
为服务器添加两个IP(单网卡双IP、双网卡双IP),实验中使用的是单网卡双IP,操作步骤如下:
编辑网卡配置文件/etc/sysconfig/network-scripts/ifcfg-ens33,将IP地址设置为静态后下方配置,再重启网络服务
1 | IPADDR=192.168.132.111 |
基于IP的配置方法与基于端口一样,将Virtualhost 0.0.0.0中的IP地址改成指定的IP,重启服务后访问测试
1 | <Virtualhost 192.168.132.111> |

基于域名
项目需求
- 网站根目录: /www/www1/
- 网站IP: 192.168.132.111
- 网站域名: www1.a.com
- 主页文件名: index.html
- 主页内容: Hello www1
- 网站根目录: /www/www2/
- 网站IP: 192.168.132.111
- 网站域名: www2.a.com
- 主页文件名: index.html
- 主页内容: Hello www2
需要先配置DNS服务,将www1与www2解析到192.168.132.111
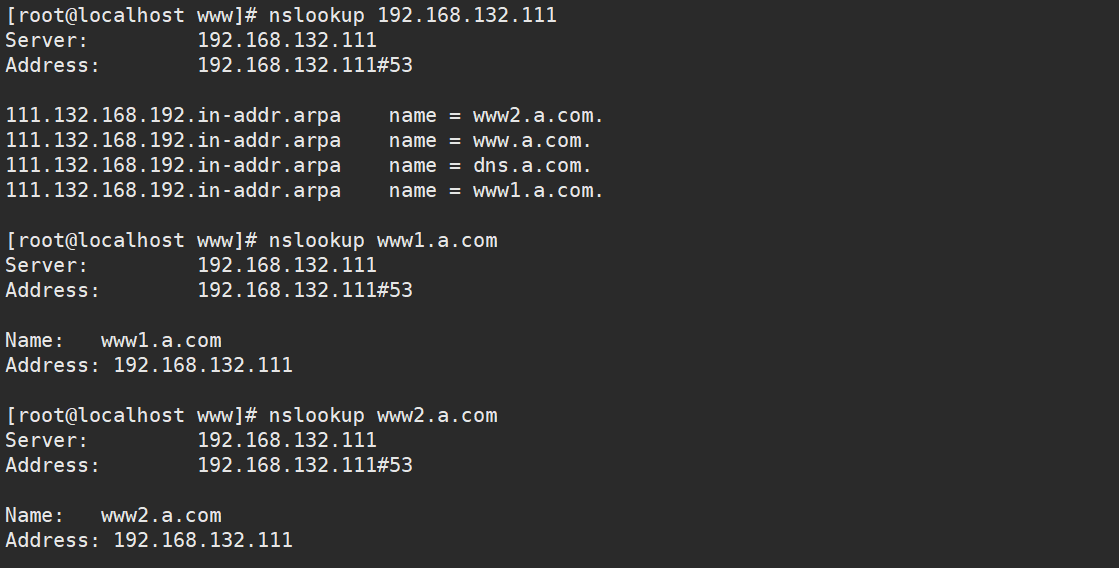
再配置子配置文件/etc/httpd/conf.d/vhost.conf,配置完成后重启服务测试
1 | <Virtualhost 192.168.132.111> |

个人主页配置
项目需求
- 网站IP: 192.168.132.111
- 主页用户: w1、w2
- 主页内容: Hello w1 | Hello w2
创建用户w1、w2,在用户的家目录下创建public_html作为web根目录,将用户家目录权限设置为705
1 | useradd w1 |

修改子配置文件/etc/httpd/conf.d/userdir.conf,注释掉UserDir disabled,将UserDir public_html取消注释
1 | # UserDir disabled |
配置完成后重启服务访问能测试,格式http://IP/~用户名/

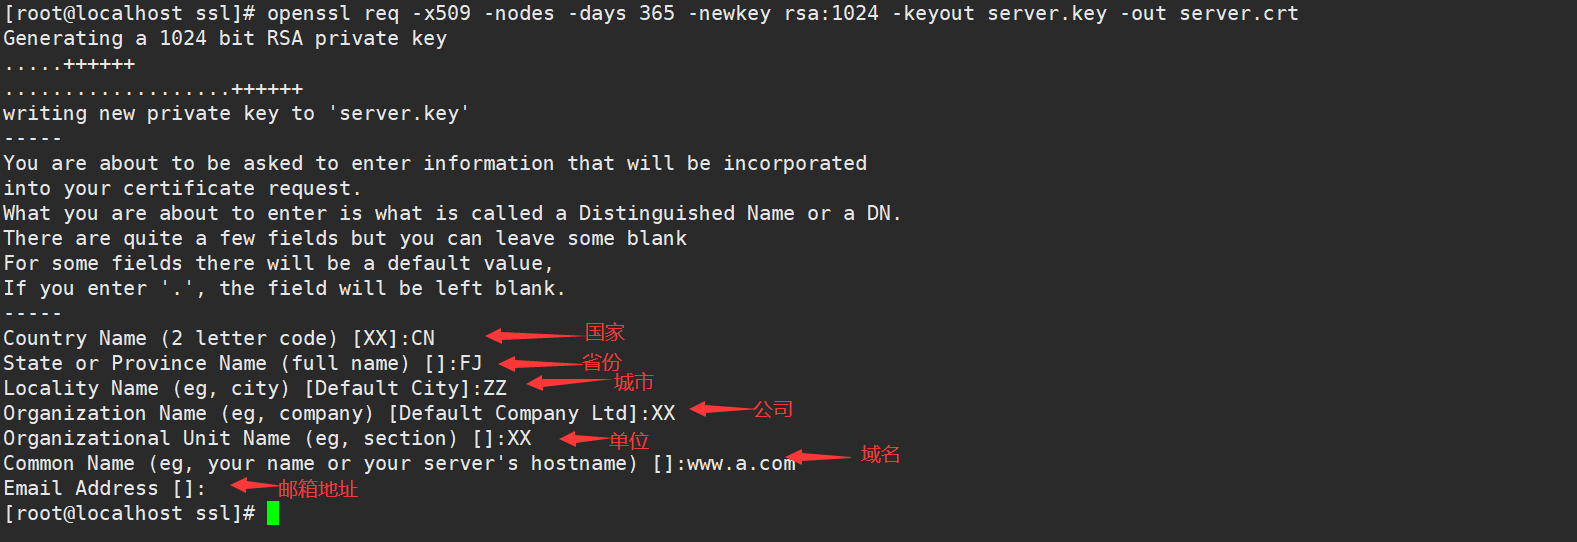
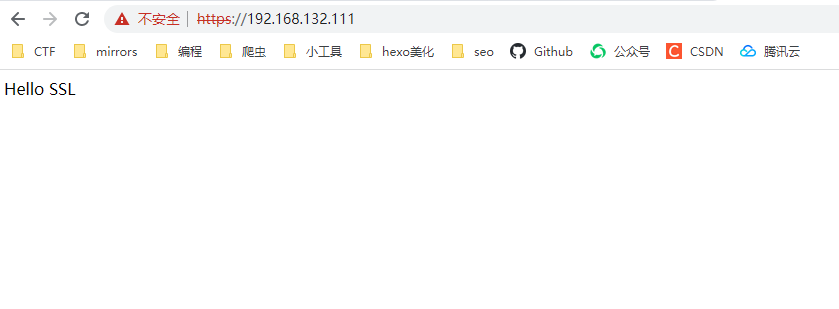
Https配置
项目需求
- 网站IP: 192.168.132.111
- 网站根目录: /www/ssl/
- 主页内容: Hello SSL
- 备注: 要求使用https访问该网站
安装mod_ssl模块,使用opensll申请ssl证书,并将证书与密钥移动到/etc/httpd/ssl目录下(方便管理)
1 | yum install mod_ssl -y |
修改/etc/httpd/conf.d/vhost.conf子配置文件,将证书与密钥路径改成刚才创建的路径,修改完成后重启测试
1 | Listen 443 |
Http重定向
项目需求
- 网站IP: 192.168.132.111
- 主页内容: Hello SSL
- 备注: 使用http访问网站时自动跳转为https
修改该虚拟主机的配置项,加入下方参数进行重定向,修改完成后保存重启服务,访问http://192.168.132.111时会被自动重定向到https://192.168.132.111
1 | RewriteEngine on |

 wechat
 alipay